
RDNA 1 Redux: Maximizing Performance With RX 5000 Series GPUs

With 2021’s seemingly endless GPU stock issues, many users are being forced to rely purchasing last generation graphics cards, or—if they are lucky—hold on to what they have, to play the latest games.

Often using an older GPU means sacrificing visual quality or resolution—trade-offs that many may find to be unacceptable. Overclocking can help of course, but what if you want more?
That, my friends, is what we are here to find out.
Navi 10: 2019’s Best Value Champ
Released in the Summer of 2019, AMD’s Radeon RX 5700 XT and RX 5700 were a breath of fresh air after years of Polaris and Vega refreshes. The first GPUs utilizing AMD’s new RDNA (1.0) architecture, they feature the Navi 10 die. A later addition using the cut-down Navi 10 ‘XLE’, the RX 5600 XT, brought the price of entry even lower.
Originally targeted to compete with the Turing-based GeForce 2070 and 2060 respectively, they were successful enough for NVIDIA to respond with the Super series of GPUs. Now, nearly two years after their launch these cards have actually increased in performance, are still strong contenders at 1440P and have proven to be good value for those who bought one. What if, however, you are gaming at 4K, or newer demanding titles like Cyberpunk 2077 are bringing your RX 5000 card to its knees?
Today in this article we are going to go over everything related to squeezing the best out of Navi 10, from the basics to the esoteric. First however let’s quickly cover the hardware in use:

Tool Box
For general overclocking, Radeon Wattman will be used. This is the inbuilt tool that comes with AMD’s driver suite. To access it, first launch Radeon Software (found by right clicking on empty space in the desktop). Once in the driver navigate to the Performance tab before going to the header labeled Tuning. You should see a screen that looks much like this after accepting the risks:
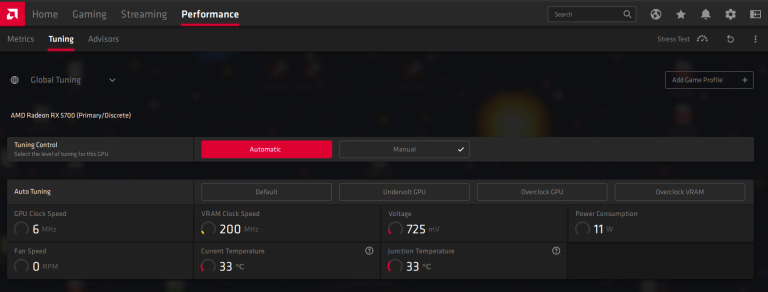
If all you are doing is basic overclocking, this is all you will need. Indeed, the auto settings are good enough for most users and, if you have a blower style card (a ‘Reference card’), I would recommend leaving everything on auto and/or setting it to undervolt your GPU. You’ll get lower temperatures and slightly higher performance this way, but if you don’t mind the noise and power draw that happens when you turn things up, read on.
The second tool I will be demonstrating the use of is actually a suite of two applications, The Red Bios Editor and the More Power Tool (commonly referred to as MPT). These two allow you to, well, modify your GPU’s BIOS easily and effectively. The software is available and explained by the team at Igor’s Lab here:
RBE and MPT article at Igorslab.de
The linked article explains the basics of the tools and gives a tutorial on their use. What’s shown in it is often more useful for cut down Navi 10 GPUs such as the RX 5600 XT or RX 5700 rather than the full die RX 5700 XT, as the latter card usually fails to max out the default limits while the cut down cards usually can. The reasoning is pretty simple; most of the dies used on the 5700 and 5600 XT didn’t make the cut because of yield reasons (faulty hardware such as shaders or logic)—not for clockspeed reasons. The fact that full-die RX 5700 XT’s don’t benefit as much from these advanced tuning methods is telling of how far these chips were pushed by AMD from the factory.
Stage 1 / Beginner: Overclocking
To start off with, overclocking with Wattman is extremely simple for users with the RX 5700 for the reasons listed above. Simply open the Manual settings, enable GPU, VRAM, and Power tuning, and then turn the max settings as high as they can go (VRAM may not be stable, be sure to test if it is by turning it up first and running benchmarks and games before turning up anything else, if it isn’t stable, move the slider back down until it becomes stable).
As this will raise power draw, you may need to touch Fan Tuning also; though this depends on your exact model of GPU. My GPU, for instance, runs quite cool at around 75 degrees with the stock fan curve in this situation, though your mileage may vary. It is worth noting that even though the stock fan curve does well, I do see improved performance by turning the fan speed up.
Once all of that is done, you should see something akin to this:
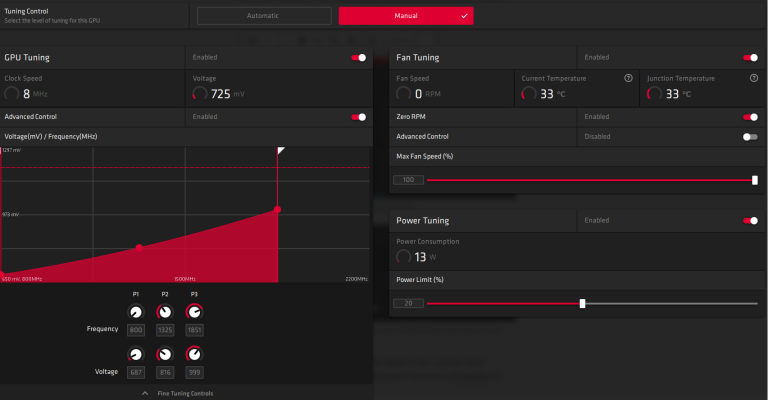

With these settings and increased fan speed, I saw a power draw increase of 30W, or 19%, and a performance increase in 3DMark’s Firestrike benchmark of 5%. Far from linear, but this is affected by the design limitations of the silicon/architecture. Some users may gain just as much performance with far less power draw (I drew an average of 185W in Firestrike overclocked, 155W stock). A better chip may allow for lower voltage, which would reduce power draw.
Stage 2 / Intermediate: BIOS Flashing
But what if you want more than a mere 5%? What if you want more than a mere 1850 MHz on the core? Well, for owners of the RX 5700 you’re in luck: you can flash an RX 5700 XT BIOS onto your card. This does come with risks: a power outage mid-flash could lead to you bricking your card, and, you have to take care when finding a donor XT BIOS. You need to use the same model of GPU, ie. I have to use the ASRock Challenger D 5700 XT BIOS to flash onto my Challenger D 5700 non-XT. Even then, take care for the revision of your card (if applicable) and try to confirm that the PCBs/circuitry are the same between models. If you accept those risks, you can get more performance… at the cost of power draw:

Flashing the BIOS like this gave me another 9% performance ontop of the last result, for a cumulative 14.57% gain over stock. The downside is, of course, massively increased power draw. Over the last result power draw went up a staggering 80 watts, a 43% increase over an overclocked 5700 or an eye-watering 70% increase over stock levels. And that’s without counting power spikes, which reached up to 278W, an 80% increase over stock. Still, it is quite the increase in performance, enough to go from 52FPS to 60FPS, for example.
Stage 3 / Advanced: BIOS Modding
But maybe even that isn’t quite enough… Maybe you want more? More performance, more options. Or maybe you just really enjoy tweaking with your hardware, tinkering with it, playing with it. Maybe you want to break some records? Maybe, you’re a wild man. This section, then, is for you.
First, using More Power Tool, comes the (obviously) power, clockspeed, and voltage limits. Power Limit Maximum can only be put to +99%, so that’s what should be set. Then GFX Maximum Clock and Memory Maximum Clock can be raised arbitrarily high, though I’d cap it at 2150 MHz Core and 1000 MHz Memory unless you’re using LN2 or have an extremely potent chip (super bin/platinum sample).
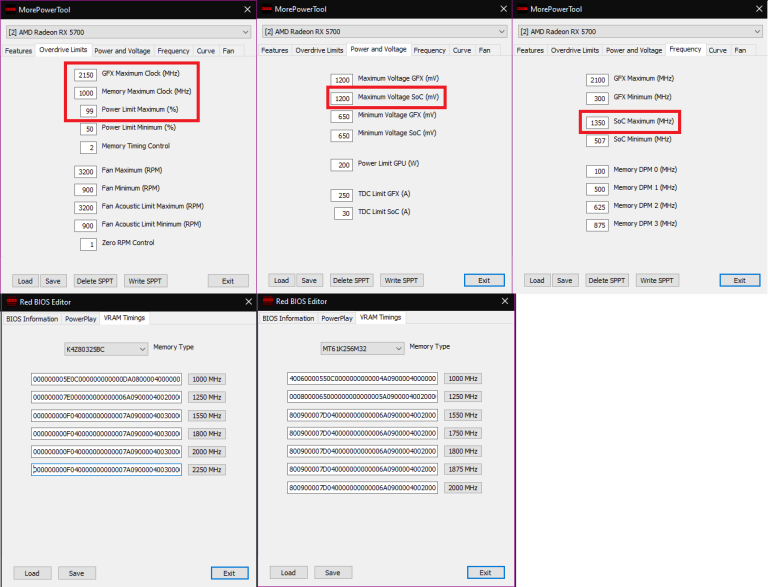
The second section changed should be Voltage. Unless you’re using LN2, I would suggest it all be left alone but for one setting; Maximum Voltage SOC can be turned up to 1200 mV to match the core. This will be important later for the following tweak: raising the SOC Maximum (MHz) to 1350 (the setting is under the Frequency tab). Once finished here, you can save the MPT and, potentially, write the settings to the Soft Power Play Tables (‘Write SPPT‘ in the interface). Reboot your system if you’ve done so, though this may not work for everyone. For those that need to, follow the instructions in the tool’s page to write it to a BIOS file.
If you do wish to modify your BIOS, I would suggest going to VRAM timings and copying the timings in the 1550mhz block down the stack. This improves performance in bandwidth heavy scenes and can improve 1% FPS lows/frame time consistency. Save the BIOS and write it to your GPU before rebooting.

This is where we start running out of actual gains, here only gaining 0.37% in Firestrike and half that in Timespy. But we also didn’t lose any performance, which makes the power results particularly interesting considering that power draw itself went down on my system, from 265w average to a mere 250w average, a 5% drop.
But you mentioned Records…
And indeed I did unnamed reader. For that, you must go back into More Power Tool and further raise SOC Maximum Clock. I managed to raise this to 1500 MHz, though others may get it higher still.
In doing so, I achieved a further 0.6% performance gain in Firestrike and, with settings that only passed Timespy a single time, a 9990 Graphics Score in the aforementioned benchmark (even if those settings raised power draw back up to 265w).
There is not, to my knowledge, an air cooled RX 5700 result that is better in Timespy, certainly not at 2150 MHz core and 1930 MHz VRAM. That’s got to be worth something, right?
But how?
To put things simply, we don’t know what SOC Maximum Clock is actually controlling. I had thought it was controlling the Memory Controller to L2 fabric clock, but the memory latency results don’t line up fully with that, certainly not with the power draw going down per clock.

That leaves us with few ideas of what it can be controlling, but some answers can only be given by AMD, who don’t comment on overclocking tools or generalities.
Putting it all Together: Full Results
Below is a gallery of various benchmark results. These results are given as is with little extra commentary. The goal of this is to show it is not merely synthetic tests that show gains from changing these settings and to show that not everything will gain the same amount of performance. Your mileage will vary.

Navi10: 2021’s Value Champ Also?
As mentioned at the beginning of the article, at it’s launch, Navi 10 represented great value for users at the upper mid-range in 2019. With the way things are going, this might also prove true for 2021 (if you already have one).
The squeeze on the silicon industry from the global pandemic and Ethereum’s most recent boom, these cards are still in high demand, but not center stage like 2020’s releases. With RDNA 2 and Ampere GPUs being the hardest to find, slightly older alternatives like the RX 5600 XT, RX 5700 or RX 5700 XT still represent great value almost two years later. If you bought one back in 2019, pat yourself on the back and count yourself lucky. If you just bought one last year or this year, it’s still a great choice.
As we have shown here, with a little tweaking and a bit of hard work the value only gets better with even more performance on the table for your Navi 10. We hope this helps carry you through the storm until you sell or retire your Radeon for something further down the line, like NVIDIA’s rumoured MCM-GPU, Hopper or AMD’s future RDNA 3.
 | A guest post by
|